Fix Windows Update Troubleshooter – I know many Windows OS users faced issues or bugs when they try to install an update on a Windows-based computer. Therefore, I’m here to tell you the solutions of some FAQs about Windows Updates errors, sourced from Windows Help. If you find any trouble in running Windows Updates, including Service Pack, due to any reasons, you might require to check out this Automated Fix It Solution, Windows Update Troubleshooter from Microsoft.
Contents
Windows Update Troubleshooter
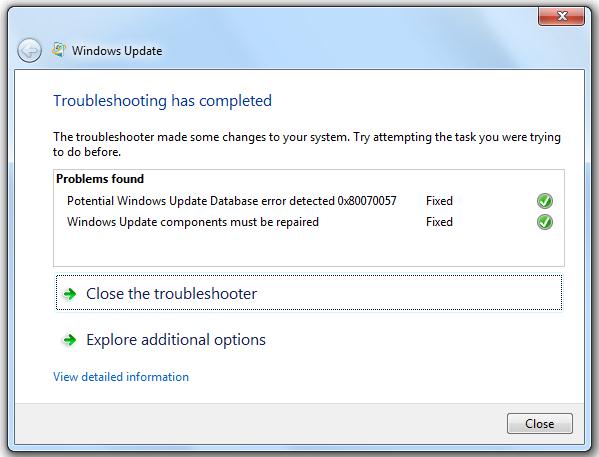
Download the Windows Update Troubleshooter from the official website and open it and follow the on-screen instructions. The troubleshooter helps you to identify the obstacles that exist on your computer, and it prevents your computer from downloading and installing faulty Windows Updates. You can permit it to fix it automatically, or you can pick the options to see the fixes and decide to implement them. But, if your computer is not fixing problems automatically, then you can try using this Windows Update troubleshooter to fix the problem.
Windows Update Troubleshooter for Windows 7
To keep up-to-date on Windows 7, you need to turn on automatic updates. With automatic updates, the users will get free from the search for updates online or worry about missing critical fixes or device drivers for your PC.
How to Turn on automatic update on Windows 7?
Step 1. Select the Start button .
Step 2. Search update and select Windows Update from the list.
Step 3. Select Change setting which is in the left pane, and then select Install updates automatically under essential updates (recommended).
Step 4. Under Recommended updates, turn on Give me recommended updates and press on OK button.
Note: It might be possible that you are unable to change the setting related to Windows update. It happens only when your PC is connected to a network where Group Policy manages updates.
How to Turn on automatic update on Windows 10?
In Windows 10, you don’t need to turn on automatic updates as it automatically downloads and installs updates. This means you get the updates for the latest fixes and security updates automatically to help your device run smoothly and it will make your device secure and safe. In most cases, your device will need to restart to finish updating. When you update your device, Make sure your device is plugged in.
Windows Update Troubleshooter for Windows 8.1
To keep up-to-date on Windows 8.1, you need to turn on automatic updates. With automatic updates, the users will get free from the search for updates online or worry about missing critical fixes or device drivers for your PC. Instead, Windows Update automatically installs necessary updates as they become available. Myfedloan servicing account Login
How to turn on automatic updates on Windows 8.1?
Step 1. Select the Start button .
Step 2. Search update and select Windows Update from the list.
Step 3. Select Change PC setting which is in the left pane.
Step 4. Then select Update and Recovery.
Step 5. Select Windows Update.
Step 6. Under Recommended updates, turn on Give me recommended updates and press on OK button
Step 7. Select Choose how updates get installed, and then, under Important updates, select Install updates automatically (recommended).
Step 8. Under Microsoft Update, select Give me updates for other Microsoft products when I update Windows, and then select Apply.
Note
It might be possible that you are unable to change the setting related to Windows update. It happens only when your PC is connected to a network where Group Policy manages updates.
Fix Windows Update issues
What does this guided walk-through do? This guided walk-through provides steps to fix problems with Windows Updates including taking a long time to scan, or error codes while installing updates.
Common error codes
The steps in this guided walk-through should help with all Windows Update errors and other issues. Now, users don’t need to search for the specific error to solve it. In most cases, some standard errors appear in the most time.
Here are some commonly seen error codes:
0x80073712, 0x800705B4, 0x80004005, 0x8024402F, 0x80070002, 0x80070643, 0x80070003, 0x8024200B, 0x80070422, 0x80070020.
Here are some steps below to help you to fix typos that come up during the time of Windows Update method.
How does it work?
We’ll walk you through a series of troubleshooting steps to get your Windows up to date. Make sure that you follow the steps in order. On which Windows version did you get the error?
If you get the error in Windows 7, then follow the steps that are given below-
Step 1. Right-click the Network symbol icon that shows network connectivity status in the notification area, and then select the Troubleshoot problems option.
Step 2. In the wizard; you found some steps to follow to diagnose and resolve your network problems.
Step 3. Run Windows Update again.
If you get the error in Windows 8.1, then follow the steps that are given below-
Step 1. Press the Windows key and search for Network problems.
Step 2. Select Identify and repair network problems on the list.
Step 3. In the wizard; you found some steps to follow to diagnose and resolve your network problems.
Step 4. Run Windows Update again.
If you get the error in Windows 10, then follow the steps that are given below-
Step 1. Download the Windows Update Troubleshooter, and then select Open or Save in the pop-up window.
Step 2. Select Next and follow the steps in the wizard to find and fix problems with Windows Update.
Final Verdict
In this article, we have read about Windows Update Troubleshooter and how to fix Windows update issues. So, guys, If you liked this article and you think this information can help someone, then please share this article with them and also provide us with your review of the contents of the article.
For much more exciting topics, stay tuned with us and also do bookmark us and we will keep you updated.


![Download MI Account Unlock Tool | Remove MI Account [100% working] Download MI Account Unlock Tool](http://www.windowsgyaan.com/wp-content/uploads/2019/03/download-mi-account-unlock-tool.jpg)


